• Product Set Up for PHP-eSeller PHP Shopping Cart Solution

  • PHP-eSeller

    To create a product, in the admin pages, click on the "Products" menu item.

    PHP Shopping Cart Solution - Select the Products page

    Click on "Create a new product" and enter in the details. Item number, item name, item description and so on.

    PHP Shopping Cart Solution - Create a new product

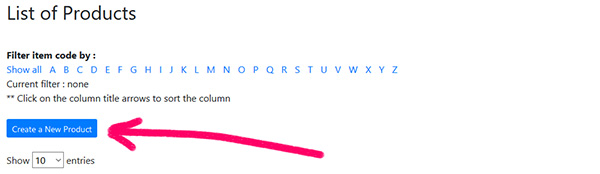
    Click on "Create" will save the product.

    For a digital product, you now need to add the file to the product. For a phyiscal product, you do not need to add a file.

    To do this, in the list of Products click on the icon "File Download".

    PHP Shopping Cart Solution - Click on the file download icon

    This will take you to a page where you can enter the file or files for that product.

    PHP Shopping Cart Solution - Enter download file name

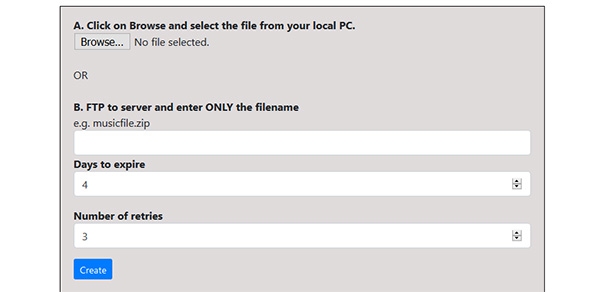
    You may add more than one file to the list so that the customer will be able to download a number of files.

    Usually a default folder has been set on the server for the digital files. If that folder is protected by an htaccess file, then all files and all sub folders within that folder will be protected, so you can create sub folders if you wish.

    You can then add in the file name into text box. The file has to be already uploaded onto your web server for this to work.

    Clicking on the "Browse" button will allow you to browse for a file on your computer and upload it to the web server. You may find that you will need to change server permissions to make this work correctly.

    When you have entered in the file name and created the entry and then return to the list of products, the red pencil will have changed to a green pencil to indicate that a file has been added.

    If you are selling audio files and you have an mp3 preview clip, then you enter the full url of the preview clip into the product page.

    mp3 preview clips are different to the files that you are going to sell in that they are not protected and can be downloaded by anyone. The mp3 clips are usually 20 or 30 second clip and have to be located in a folder separate to the digital files that you are going to sell.

  • PHP-eSeller

    Album example with categories

    If you wish to create an album type mp3 system then you will need to control the display order of the album and tracks using the sort order.

    There are different ways of doing this but one way would be to first create a set of categories which are the album titles.

    You then create your product (the track) and place the track into the appropriate album.

    You will want to create an "all album" product so that you can sell the complete album in one go. Then you will want individual songs for the tracks so that customer can purchase individual tracks.

    The "all album" product can be given a sort number of 0 so that it appears at the top of the display within that category.

    You then create each track giving each track a sort number. Normally, you would give a sort order equal to the track number so that the tracks are then displayed in sequence.

    To add your digital files, click on the 'File Download' link in the list of products.

    This will take you to a page where you can enter the file or files for that product.

    For the album, you may want to enter all the tracks against the product. Then, when the customer makes a purchase, they will be able to download all the files against that purchase.

    For each track you may want to enter a preview mp3 clip into the product.

    Album example with categories and subcategories

    Another method of controlling the display is when you wish to use the categories for main subheadings, e.g. you may have categories of "Digital Downloads", "CDs", "Ring tones"

    Within the "Digital Downloads" subcategory, you then create subcategories for the Album titles.

    You then create your tracks and identify them against the correct subcategory and use the sort order in the product to control the track display.

    Controlling menu order

    The sort order of the categories and the subcategories can also be controlled. This allows the menu systems to be displayed in the order that is required.

    The sort order for categories and subcategories are entered in the "Categories" admin section. Entering 0 will move the entry to the top.