Configuring the fckeditor HTML editor

The fckeditor is described on the web site http://www.fckeditor.net and is a configurable html text editor with many add ons and plugins.

The configuration file in the fckconfig.js file is set to use the english language ‘en’ with a toolbar set called ‘pg_toolbar’. The FCKEditor web site provides full desciption on its options and configuration.

The fckeditor has the ability to upload images and files with a file manager system. This is disabled by default.

To set up the upload facility in fckeditor.

(A)

In the file \fckeditor\editor\filemanager\browser\default\connectors\php\config.php

change ‘false’ to ‘true’ to allow uploads.

The relevant line in config.php file :
// SECURITY: You must explicitly enable this “connector”. (Set it to “true”).
$Config[‘Enabled’] = false ;

(B)

Create a folder on the server where you want the files to be located and identify
the folder in \fckeditor\editor\filemanager\browser\default\connectors\php\config.php

Then change the permissions on that folder to 777.

The relevant line in config.php file :
// Path to user files relative to the document root.
$Config[‘UserFilesPath’] = ‘/UserFiles/’;

the document root being the root of the web server.

Another area of customisation that you may want to implement is defining the toolbar that appears above the text box which is used to enter product descriptions. The toolbar has been trimmed to make it more manageable and to remove tools that are not required all that often. However, you may want to add back in some buttons which is very easy to do.

Open up the file /fckeditor/fckeditor.js with a suitable text editor.

The toolbar that we use is called FCKConfig.ToolbarSets[“pg_toolbar”].

The default toolbar is FCKConfig.ToolbarSets[“Default”].

If you want to add a button from the default toolbar, just copy it and place it into FCKConfig.ToolbarSets[“pg_toolbar”].

Or if you want all the buttons, rename FCKConfig.ToolbarSets[“Default”] to FCKConfig.ToolbarSets[“pg_toolbar”] and remove the old FCKConfig.ToolbarSets[“pg_toolbar”].

Note that the very last button on the toolbar is used to maximise the editor window which can help if you are doing more detailed work with the html.

EasyPHP on Windows 7

EasyPHP is an application that you install on your Windows computer which you can use as a development system for PHP / Apache and mySQL databases.

It can be downloaded form http://www.easyphp.org/ and I find it a very good way to develop applications using PHP on my Windows computer.

EasyPHP contains a single exectuable which when run, installs PHP, Apache web server and a mySQL database onto your Windows computer. All
very neat an convenient to use.

However, when I tried to install on Windows 7 I came across a number of issues with Apache and with mySQL.

When I launched the software, Apache wouldn’t start. Here is the error :

Apache cannot run: another Web server is using the Web port or port is blocked by firewall.

To overcome this issue :

1. Click the EasyPHP icon beside the “Apache” button.
2. Click “Configure” then click “EasyPHP“.
3. Uncheck “Check server’s TCP port before starting” then click “Apply” button and then “Close” button.
4. Click “Apache” button and then click “Start“.

That fixes the “Apache cannot run…” problem.

The above gets the Apache server to work but after I closed EasyPHP and ran it again, I got this second error message :

Unexpected end of MySql… See log file?

This is a mySQL error message and is actually a file permission problem.

So I changed the user permission for the EasyPHP directory and mySQL correctly started.

To set your permissions this is what you do :

1. Open and view Drive C using the windows explorer, then double click “Program Files” assuming that you installed EasyPHP in that folder.
2. Right click on the folder where you installed EasyPHP then click “Properties“.
3. On “Security” tab click “Edit…” button.
4. Select the user that you are currently using. This will probably be something like “Users (computer name)”
5. Under “Permissions for Users” box, tick “Full control” on “Allow” column.
6. And then click “OK” button to apply the changes.

Now you should be able to start mySQL server by clicking “mySQL” button on EasyPHP dialog and then click “Start“. Or shut down EasyPHP and restart it again.

Hopefully that will solve issues when working with Windows 7 and EasyPHP.

Things to check if username / password is not sent

When you have completed the set up of PHP-eSeller, here are a few pointers which you should check if emails are not being sent out after a purchase.

  • Make sure that you have assoicated a digital file with the product that you are purchasing.  If you have not assoicated a digital file with the product, an email will not be sent to the purchaser although an email will be sent to the admin email address saying no file is assoicated with the product.
  • Check that your web server is able to send emails using PHP.    Most web servers will not have a problem with this so is unlikely to be the issue now.
  • Check if you have entered the installation url correctly in the Global Set up admin page. I have seen http://wwww/ rather than http://www. or even just www.
  • Check that your PayPal email address is the PayPal PRIMARY email account which you set in Global Set up admin page.

Restoring Your mySQL Database From Backup using phpMyAdmin

phpMyAdmin is a program used to manipulate databases remotely through a web interface. A good hosting package will have this included.

  1. Login to phpMyAdmin.
  2. Create a new blank database first.
  3. Click databases, and select the database that you will be importing your data into.
  4. Across the top of the screen will be a row of tabs. Click the Import tab.
  5. On the next screen will be a Location of Text File box, and next to that a button named Browse.
  6. Click Browse. Locate the backup file stored on your computer.
  7. Make sure the SQL radio button is checked.
  8. Click the Go button.

Eventually you will see a success screen.

Backing up a database using phpMyAdmin

This desciption is applicable to all the applications PHP-eSeller, PHP-SecureArea and PHP-KeyCodes.

You should backup your database at regular intervals. You will then be able to restore the database if something goes wrong.

phpMyAdmin is the name of the program that you can use to manipulate databases.  It is usually provided as part of you control panel from your hosting company.

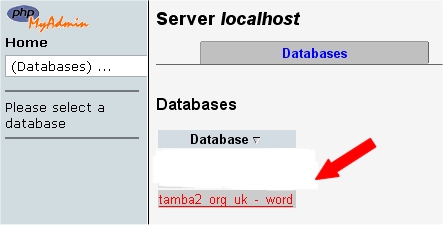
1.  Log into your web server control panel to access phpMyAdmin

2. Select ‘Databases’

Backup 1

3. Now click the name of your database.

Backup 2

4. The next screen will show you all the tables inside your database.  Click the ‘Export’ tab on the top set of tabs.

Backup 3

5. Look at the left box at the top of the Export section. All the tables in the database you selected are in that box.

Backup 4

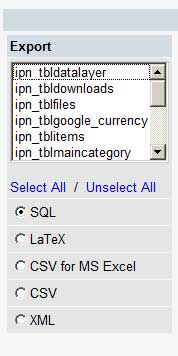
* If you have other programs that use the database, then choose only those tables that correspond to your install. In the case of PHP-eSeller, they will be the ones with that start with “ipn_”, with PHP-SecureArea they are the ones that start with “sec_” and with PHP-KeyCodes, they are the ones that start with “key_”
* If the database is being used only by the one program, then, leave it as is (or click ‘Select All’ if you changed the selection)
* Ensure that SQL is checked.

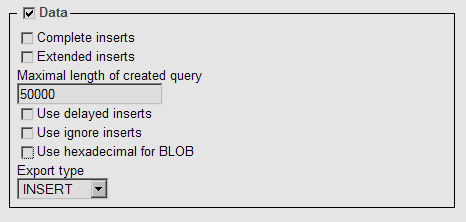
6. In the SQL section, tick the following boxes:

* ‘Structure’
* ‘Add DROP TABLE’
* ‘Add AUTO_INCREMENT’ and
* ‘Enclose table and field names with backquotes’

7. In the DATA section, leave the boxes inside this section unticked, but make sure to keep the checkbox next to the “DATA” heading checked.

Backup 4

8.  Tick the ‘Save as file’ option, and leave the template name as is.

Backup 5

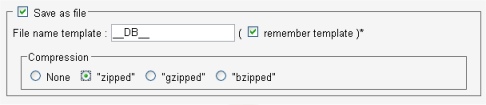
9. Now click ‘Go’ and you should be prompted for a file to download. Save the file to your computer.  Depending on the database size, this may take a few moments.

10. You have now backed up your database.   If you wanted, you could download a backup in each of the compression formats. Your choice. For example: None and “zipped

Remember : You have not backed up your files or images.  Only the database itself.