Updated book PHP Tutorials: Programming with PHP and MySQL

PHP Tutorials Cover ImageThe eBook and Physical Book PHP Tutorials: Programming with PHP and MySQL has been recently updated to include new examples, expanded code explanations and updated material.   In particular:

* The removal of code and descriptions only relevant to PHP versions earlier than
PHP 7.
* Expansion of code examples.
* More explanation of code as used for connecting to databases using PDO and mysqli.
* Further details in data validation.
* Best coding principles and practices.
* Plus many other changes.

US Web site

or

UK Web Site


How to stop the deduction by Amazon of 30% tax for non-US residence for book sales

If you write and sell eBooks on Kindle and CreateSpace, and you are not a residence of the US, any sells made in the US have 30% tax deducted at source.  On top of that you will have to pay tax to your country of residence as you would for any untaxed income.

However there is an agreement between the US and other countries that enables you to have 0% deductions.  You still have to declare the earnings to your own tax office but you do save that 30% which can be quite significant.

To have 0% deducted is now fairly straight forward.  The process has improved quite considerably and you should be able to sort it out in half an hour and not have to phone the US tax office to get a tax number reference as you had to previously.

Log into your KDP Kindle account where you books are listed, click on the Account link.  You may have to log in again at this point.  The page that is displayed shows account and tax information.  Click on the View/Provide Tax Information button.  Now click on the Tax Interview button which will then take you to a series of questions.

Go through the questions.  I choose ‘individual’ as the type of organization which is probably what most people will do.  The important question is your tax reference – select that you are not a US resident and then enter in your NI (National Insurance number) or UTR (Unique Tax Reference), or the equivalent tax reference that is used in your country, then go through the rest of the questions.

A form will display (W8-Form) at the end which should show your tax deduction is 0%.  If you don’t see 0%, you must have selected something wrong, so cancel out and start again.

Take a screen shot of the form for record purposes.

You now have to sign the form electronically.

You do need to keep a record of sales as you may have to pass that value on to your tax office.  Amazon will send either a physical tax report or an email to you which you should retain if the tax office wants proof.

HMRC is the UK tax office and I have found them to be quite helpful if you are just declaring a small amount of un-taxed income (less than £2,500) when you are in full employment.  You don’t have to do a full tax return and they will just modify your tax code over the phone.  Obviously if there is much more untaxed income such as capital gains or company payments or you are self-employed then you will have to do a tax return, but many people are just writing a book to earn a small amount of cash while they are in full employment.

Word Large Documents with different header / footer

It is not immediately obvious how to do different header / footer for different Chapters in a long document.

The main control of this is by section breaks.  For each section that requires a different header / footer you use a new section break.

In word 2013, go to “PAGE LAYOUT” and select “Breaks”.  In the drop down list select Section Breaks -> Next Page
This inserts a section break and starts a new section on the next page.  Other versions of word will be similar.

Create your header in the normal way by double clicking on the head of the Word document.

Once you have your section breaks set up, the next important step is to control the linking between headers in different sections.  To do this you go into editing of the header by double clicking on it.  In the menu bar you should see “Link to Previous”.  If you are in the second section of a document, you click on this to unlink the header of the second section.  You can then edit the header in the second section and that will allow you to have a different header in that second section.

You can now do other clever things such as different header / footer for odd / even pages and that is controlled from the header menu bar by ticking the appropriate tick boxes.

Formatting for Kindle eBooks – Hints, Tips and Tricks

There are a number of articles on formatting an e-book for Kindle so I thought I would contribute my thoughts and ideas so far.

The most common way to create a Kindle e-book is to use Microsoft Word because it includes easy editing features, table of content generation, spell checker, control of style sheets and so on.

You then do a “save as” to HTML from Word to create an HTML document and then apply any adjustments in the HTML code itself. You can create a book from HTML but it would require much more editing. Amazon then takes the HTML document, and converts it to the required format for Kindle devices.

So the principles are:

  • Create a separate Word file for each chapter of your book.
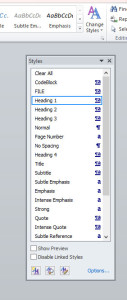
  • Format your document using styles.
  • Create a combined master Word file of all your chapters.
  • Expand the master file into one Word document.
  • Do a Ctrl-A to select all the text and then copy all the text into a new blank Word document.
  • Do a Save As to Filtered HTML so that you end up with one large HTML file with the images in a separate folder.
  • Do some final adjustments and tweaks to the HTML by hand.
  • Preview your HTML in an Amazon previewer application.
  • Zip up the HTML plus the images and then upload to Amazon.
  • Create a cover image and submit it to Amazon.

Word Template
I have included my template for Word which has been quite successful so far. However, I still find I have to do some changes to the HTML by hand.

Click here to download my zip file which includes a Microsoft Word template system.

Word format for Kindle

Font Face
Font face can be whatever you want as Kindle will uses its own default font and the user can define their own font face.

However, you usually select Caliba 11pt

Tabs
Tabs don’t transpose all that well into HTML so it is best to remove any tabs in the Word text. This can be done by searching for ^t

Bullets
Word formatted bullets do not work correctly because they use tabs and have images which don’t seem to convert correctly into HTML I would suggest to use normal unformatted paragraphs but with the * character to represent the bullet.

Tables
Y
ou can use tables in latest Amazon Kindles and you can colour the rows. You have to be careful if the text does not wrap in which case you have to force a line to wrap.

Pictures
Images should be inserted in JPEG (or .jpeg) format with centre alignment (don’t copy and paste from another source).

Select “Insert” > “Picture” >

It is recommended that images are saved at 300 dpi at about 640 pixels wide. The image should not be greater than 127kbyte (63kbyte on older Kindles) so use 300 dpi unless the image file size is too big.

Expanding the sub documents
When you expand the Word documents into one single Word document, do a “copy all” and paste into a new word document to copy the text over. I have found this to be the best method as it removes any dependencies to other sub document files that you may have.

Save as HTML
Once you have completed the formatting in Word and have one combined word document with index pages, preface and so on, you save it as “HTML Word Filtered” and then you should test it in a Kindle viewer and with a web browser.

File -> Save as…

select the location where you want to save the file, and in the “Save as type” drop down list, select

“Web Page, Filtered (*.htm, *.html)”

This will create the HTML page and a folder with all the required images. You should then go through the HTML code and make changes manually.

Editing the HTML
I have found issues with images which I can only seem to fix manually in the HTML code by changing the images to

width=”100%”

and

align=”center”

so that the image scales to fit the width of the page. Note the align=”center” which forces the text to go to the bottom of the image instead of wrapping around it.

When you upload the document to Amazon it converts it so that every first line of each paragraph has an automatic indent.

This seems to be because an assumption by Amazon that all first lines should have an indent and all paragraphs should be justified. For some books this is fine, but personally I don’t like first line indents or justified text.

To overcome this, edit the styles for various p tags with the addition of

text-indent: 0px;

to stop tab indexing.

I have now modified all my Word styles with a first line indent of 0.01.  This is for the normal style.  This has the effect of overriding the Amazon indent style so you dont have to do anything about this.

If you want to set this up yourself, go to the “normal” style, right click on it and and select Modify. Then select Format.. button and then Paragraph… Then in the Special drop down list select First Line and in the amount, enter 0.01cm.

You may want to go into the HTML and search for justify in the HTML code and remove those entries.

Also Amazon displays text as justified so I then edit the HTML styles by hand to add in

text-align:left;

on all paragraph tags. This will cause the text not to be left formatted without justification.

Uploading to Amazon
Once you have your complete HTML document with any images, you should then upload it to Amazon. When you converted to from Word to HTML it would have created a folder of images as well as the HTML file itself. Zip all the files up including the image folder and upload the single zip file. Amazon will unzip and convert and publish the HTML document.

The book Cover image

Kindle has an article on creating a book cover image at:

https://kdp.amazon.com/self-publishing/help?topicId=A2J0TRG6OPX0VM

Essentially this says that there are two types of files for cover images:

JPEG, or .jpeg
TIFF, or .tif(f)

Do not optimise the images as the Amazon process applies its own compression to images when displaying them on its website.
Dimensions
The dimensions of the image should have an ideal height/width ratio of 1.6 so this means:

• A minimum of 625 pixels on the shortest side and 1000 pixels on the longest side
• For best quality, your image would be 1563 pixels on the shortest side and 2500 pixels on the longest side

Colour
Colour images use the standard web RGB (red, green, blue) system which is native to the web and screen displays.
You should use colour images whenever possible and relevant. The Kindle reading device has a black and white display other devices such as the PC and iPhone use colour fonts and images.

Borders for White Cover Art
Cover art with white or very light backgrounds can seem to disappear against the white background.
Adding a very narrow (3-4 pixel) border in medium gray will define the boundaries of the cover.
Some tips for marketing ebooks

The important aspect of a book is the quality. The better the quality the more it will sell. Quality can be many things such as consistency of writing style, formatting of tables, good quality images and so on.
Here are a few tips that may help to market your eBooks:
1 Design a cover that jumps out at you from the amazon store displays. It should look good at full size and as a thumbnail. Make sure that the thumbnail image is readable and recognisable. If you cannot create a good quality cover, then employ a design service to do it for you.
2. Carefully edit and proofread for spelling, grammar and style.
3. Amazon requires a description of the book so make sure that this is interesting and informative.
4. Fill in your author profile at Amazon Author Profile to give information about yourself to your potential readers. Combine this with a blog to keep readers informed about changes to your book.
5. Promote your book online using the standard social networks such as Facebook and Twitter. You can also create a web site for you book providing information and links, promote your book on other sites, message boards and other communities.
6. Create a promotional video and book trailer and upload it to your web site, blog or to your Amazon Author Profile page.
7. Create a physical version of your book using CreateSpace which is a print on demand system.
8. Join the Amazon Associates program to earn an additional 4% on each sale. You can add links to your web pages and gain an additional 4% on each sale when a customer clicks through.
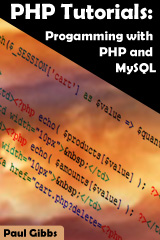
Amazon Reviews for your Books

The Amazon reviews can have a huge effect on your book sales.  You need to be popular to become popular which can be tricky when you first make a book available.

You need to drive as many reviews to your book as possible so try to get your friends and family to do a review each.  A minimum of 4 or 5 is really good but up to 10 is what you need.

The number of reviews a book has is a good indicator to a possible purchaser as to how serious they should consider it.

As a self publisher you have to take responsibility to make sure this section is populated which means promoting it in wherever you can.  Unfortunately, a genuine review is usually only made when the customer either really loves it or really hates it.

Once you have got going with reviews you should be able to rely on your normal sales to get further reviews.

Book Front Cover Layout and Design

Creating a stand out front cover is a must to get your book noticed on web sites and in book shop shelves – if you are lucky to get your book that far.

The front cover needs to be smart, professional and not too complicated. Your potential purchaser will see it as an indication of the quality of what is inside if the outside looks good.

As you will probably be selling an eBook version, you need to have a thumbnail image which can be placed on web sites and will be used as the image on sites like Amazon. This has particular display issues as you must use fonts, images and graphics that are clear to read even when the cover is reduced to a thumbnail. Make sure that there is sufficient contrast between the background colours and the text. Don’t forget the back cover where you can add some text to advertise your book.

Web links:

An article from the Book Designer:
http://www.thebookdesigner.com/2012/01/book-cover-design-and-the-problem-of-symbolism/

a simple On line cover designer:
https://www.createspace.com/Tools/CoverCreator.jsp

A free free on line graphics program which has many of the functionality of PhotoShop:
http://pixlr.com/

How to remove unwanted styles from Microsoft Word

I use Word to write and format my eBook and printed version of the book because it is easy to use and is a common platform with plenty of online help.  However, it has take me a very long time to become comfortable with styles.

The main issue I have had is how to removed unwanted styles.  I found that my styles list was made up of styles with similar names.  So I had one style called CODEBLOCK and others called CODEBLOCK1 , CODEBLOCK2, CODEBLOCK3 and so on.  In some documents this amounted to thousands of unwanted duplicate styles which slowed down loading the file.

I don’t know how these were created, it may have been something to do with Master Pages or possible to do with copying text from one document to another.  It made the document larger than necessary and when I did saved the file as HTML I ended up with a massive list of css styles in the HTML document.

I tried a number of methods, one of which was to run a Word make to delete unused styles.  This particular macro seemed to work on small documents, but caused Word to hang up when I tried it on large documents.

Eventually I found a way of getting rid of them but event this method can take a a few minutes per file.

First you need to show the styles window which will look something like:

styles

Click on Manage Styles icon at bottom of display.
Click on Import/Export…

This display allows you to select multiple styles in the left hand column and then delete the multiple styles.

Use the mouse button with the Ctrl key to select the multiple styles and then delete them.  Note that you cannot delete built in styles and also this displays allows you to move styles from one document to another.

Next step for PHP Tutorials eBook

The eBooks is on sale on the Amazon web site and hence is available for Kindle devices.  It is also available as a PDF download which may be purchased from my web site http://www.paulvgibbs.com.

The next step is to make the eBook more widely available through other stores and other formats and to create a forum where purchasers of the book can more easily ask questions and discuss PHP coding issues.

In the mean time you are quite welcome to ask questions via my email.